Air Con Installation*
Installation Steps
- Selection of the installation position.
- Installing the air-conditioner
- Expelling the air in the pipes and the indoor unit.
- Connecting the pipes and wires.
- Testing.
- The customer should provide a suitable power supply source, its voltage should be in the range of 90-110% of its rated voltage.
- The power supply circuit should have MCB leakage protection. The capacity should be more than 1.5 times of the maximum current.
- Must use independent circuit and suitable grounding socket matching with the plug of air-conditioner.
- The wiring must be installed by qualified electrician according to the electrical safety requirements.
- The air-conditioner must be well grounded, the switch of the main power of air-conditioner must be reliably grounded.
- The power supply wire, must be changed by qualified electrician.
1. Selection of the installation position
Indoor Unit
Indoor Unit
- There is no heating and steaming source nearby.
- No obstacles for installation position from nearby.
- Keep good air circulation.
- Convenient to adopt measures to reduce noises.
- Dont install them near the doorway.
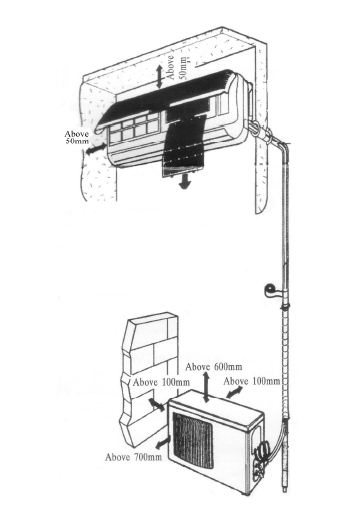
- Make sure to have the distance specified in the picture between the ceiling, wall, furniture and other obstacles.
- 2 meters high above the floor.
- In case that you put up a canopy to protect it from rains and sunrays, pay attention not to cause any obstacles for the heating dispersion for the condenser.
- Dont keep animals or plants near the installation location for the hot air from the outdoor unit will affect them.
- Make sure to have the distance specified in the picture between ceiling, wall, furniture and other obstacles.
- Stay away from heating source and inflammable air.
- The installation base and supporting frame should be strong and secure. The machine should be at a level surface.
2.Installing the air-conditioner
Installation of the Outdoor Unit
Installation of the Outdoor Unit
- The outdoor unit must be firmly fixed to avoid falling in strong wind.
- Install on the cement base as in the drawing.
- If it is installed at seaside or at a place high above the ground and with strong wind, the AC should be installed against the wall to ensure the normal operation of the fan and the blocking plate should be used.
- If it is an overhanging installation, the structure of the mounting wall should be made of solid, cement or materials with equivalent strength, and of sufficient support capacity. Otherwise, measures such as reinforcement, support or vibration damping should be adopted.
- First make changes to wall and make sure that is hard and secure. Using four + type screws to fasten the installation board onto the wall. Keep it level in horizontal direction and perpendicular in vertical direction. Otherwise it might cause water drips when air-conditioner is running in cooling operation.
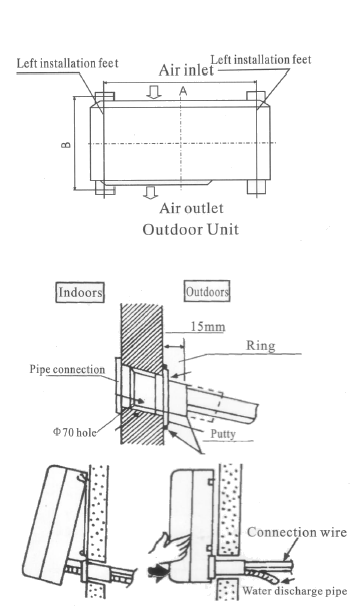
- Drill 70mm diameter pipe hole at the left lower or right lower side of the installation board. The hole shall slant outward slightly.
- Hang the indoor unit to the board and make sure the machine is in the middle of the board.
- Push the machine towards the left lower and right lower side of the installation board until the hangers enter tightly into the groove (it produces click sound)
Check the water discharge
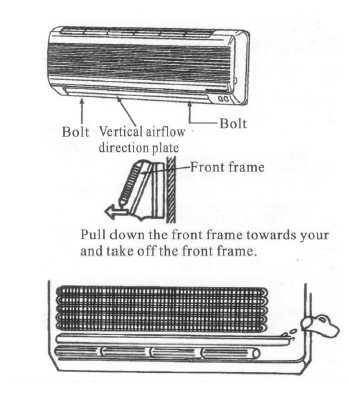
Take off the frame from the unit cover. Take off the front frame for maintenance according to the following steps:
Take off the frame from the unit cover. Take off the front frame for maintenance according to the following steps:
- As shown in the picture on the right, take off two covers from the front frame and then unfasten two fixture screws.
- Pull the front frame towards yourself and take it off. To put the front frame back, reverse the steps. You should check whether the front frame is firmly fixed into the fixture groove on the top.
- Pour a cup of water into groove.
- Check whether the water flow through the water discharge hole.
3. Expelling the air in the pipes and the indoor unit.
Humid air in the refrigerating system might cause trouble of compressor.
Humid air in the refrigerating system might cause trouble of compressor.
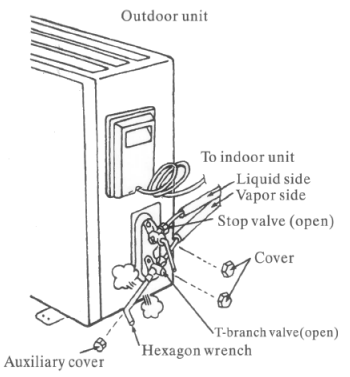
- Take off the cover from the stop valve and T-branch valve.
- Take off the auxiliary cover from the T-branch valve.
- Turn the stop valve rod anti-clock wise to an angle of 90 degree, keep it open for 8 seconds and close the valve.
- Check whether there is air leakage at all connection parts of pipes.
- Push the top rod of T-branch valve by hexagon wrench to expel air.
- Repeat the third and fifth steps.
- Open the stop and T-branch valve with a hexagon wrench to make the unit operate.
- No leakage is allowed, please check all the piping connection parts. You must test the leakage, generally, it can be tested by soap water.
4. Pipe Connection
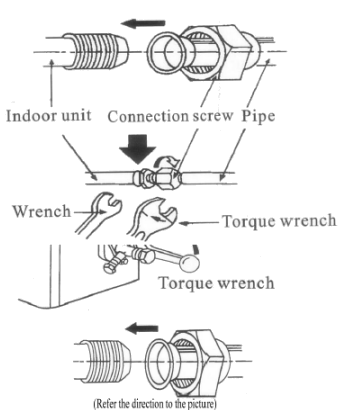
- Connect the pipe to the unit: point to the center of pipe and fasten the connection screw at first by hand and then by wrench until it is tightly fastened. The fastening direction is shown in the picture.
- Pointing towards the center of pipe, fasten the screw with strength.
- Wrench the screw in the end until you hear the click sound.
The fixing of pipes
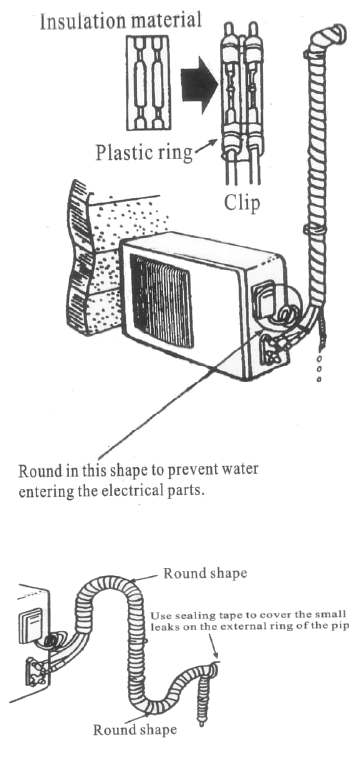
- Wrap up all pipe, water discharge and connection wire from top to below.
- Cover the connection parts with insulation material and fix them with two plastic rings.
- Wrap up the pipes with tape alongside the wall and fix them to the wall with clips. These steps are usually adopted when outdoor unit is installed below the indoor unit.
- In case that you want to have additional water discharge pipe, the end of pipe should be within certain distance from the floor (to prevent water from draining back into the pipe). Fix it onto the wall so it wont be swayed by wind.
- Wrap the pipes and connection wire well from below to top.
- Wrap up the pipes that are rounded up in the way shown in the picture so it can prevent water from entering the room.
- Use clips or other fixture to fasten the pipes to the walls.
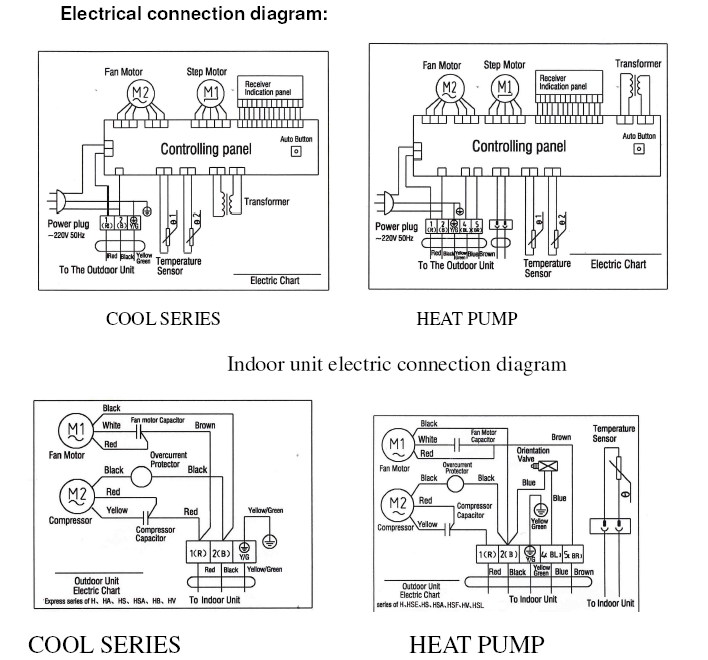
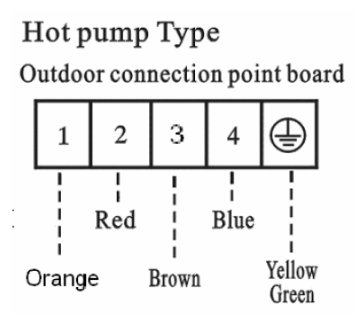
Electrical connection
- Unscrew the screw, take off the control panel cover from the unit.
- Cooling type: connect the wire to the related connection point on the panel and connect the signal connection plug.
- Cooling and heating type: according the color, connect the wire to signal connection plug different related connection point and connect the signal connection plug Remarks: yellow and green wire should be connected to connection to earth.
- Fasten the fixture of wire to control panel.
- Screw up the control panel cover to its original place.
5. Testing
Make sure that the pipes and wires are connected and that both the liquid valve and gas valve on the side are completely open.
The connection of power source
Make sure that the pipes and wires are connected and that both the liquid valve and gas valve on the side are completely open.
The connection of power source
- Connect the wire to independent power source socket.
- Preparation of remote control.
- Run the air-conditioner in cooling operation mode for 30 minutes or longer.
- Test the out and in air temperature.
- Make sure that the temperature difference between the out and in air is greater than 8oC.
- Fix the machine firmly, otherwise it will produce noise and vibration.
- Install the outdoor unit where it will not disturb your neighbor.